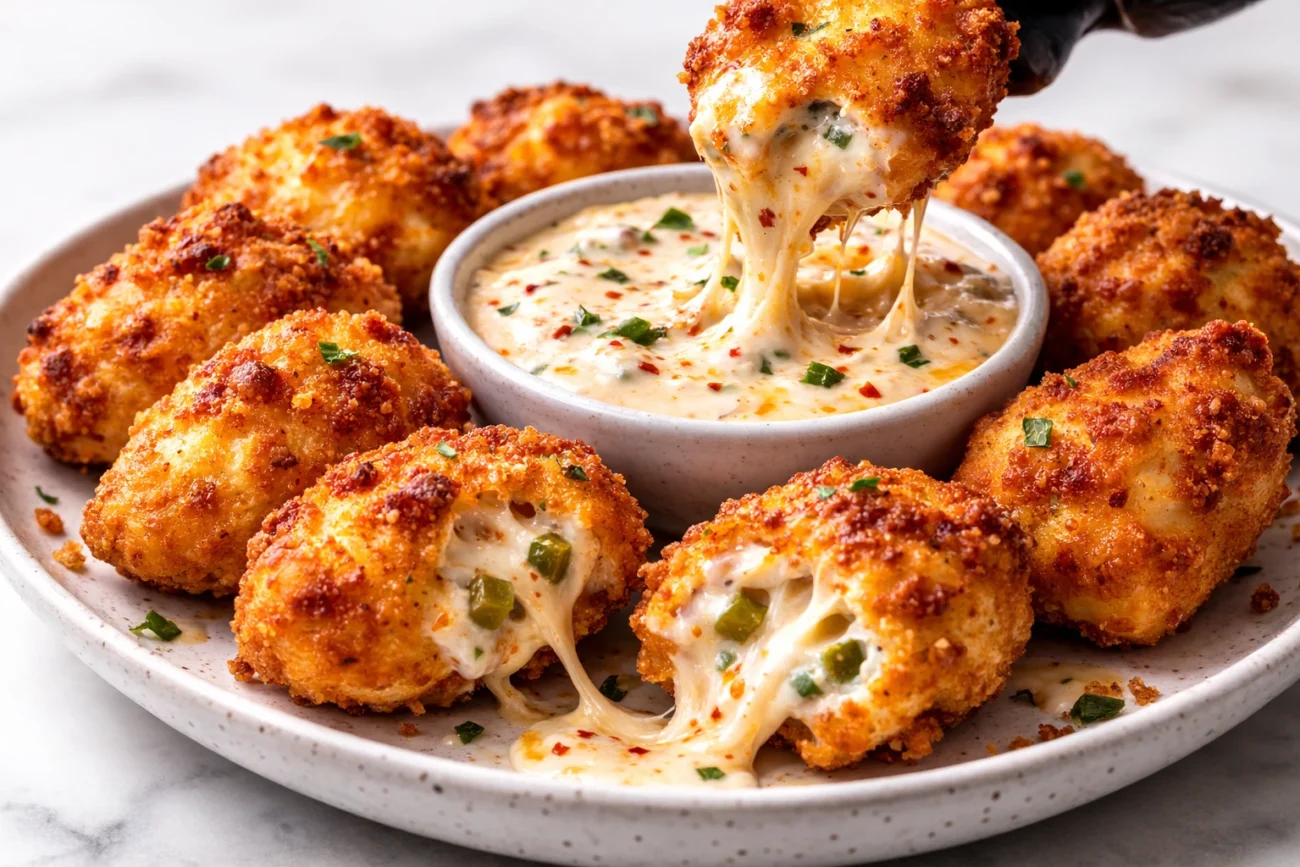
Jalapeno ranch poppers are a baked appetizer made with halved jalapeños filled with a thick ranch-seasoned cheese mixture and baked until hot and lightly golden. This version keeps the process simple and reliable for a home kitchen.
They work well for game days, family gatherings, or when you need a make-ahead snack that reheats cleanly. Because they bake on a sheet pan, cleanup stays minimal and timing stays consistent. Browse more party-ready recipes in the snacks category for additional game-day and appetizer ideas.
The filling is structured so it holds inside the pepper. Cream cheese creates the base, shredded cheese adds melt and browning, and ranch seasoning provides salt and herb balance without extra measuring.
You can control the heat by adjusting how thoroughly you remove the seeds and membranes. The method stays the same whether you want mild or spicy. If you enjoy bold, creamy appetizers, creamy buffalo chicken dip offers a similar ranch-style flavor in scoopable form.
Food Safety Advisory: If using bacon, cook it fully before mixing into the filling. Bake poppers until the cheese filling is hot and bubbling. Refrigerate leftovers within 2 hours and store in airtight containers. Reheat to an internal temperature of 165°F before serving.
For official U.S. safe handling guidance, refer to: USDA Food Safety and Inspection Service .
| Time Breakdown | |
|---|---|
| Prep Time | 15 minutes |
| Cook Time | 16 minutes |
| Total Time | 31 minutes |
What Is Cheesy Jalapeno Ranch Poppers
Cheesy jalapeno ranch poppers are fresh jalapeño halves stuffed with a thick cream cheese mixture flavored with ranch seasoning and shredded cheese, then baked until set. The texture should be creamy inside, with a softened pepper that still holds its shape.
Baking keeps the process clean and consistent. The filling thickens as it heats, so it stays in place rather than running out. Light browning on top gives structure and prevents the filling from feeling loose.
If you add bacon or chicken, protein increases and the filling becomes more substantial. However, the dairy base alone still creates a balanced, satisfying bite.
Ingredients
These jalapeno ranch poppers taste better when the filling has a little tang, a little smoke, and a little texture. The add-ins below keep the same thick structure, but make the flavor deeper.
- 12 fresh jalapeños, halved lengthwise and seeded
- 8 oz cream cheese, softened
- 1 cup shredded sharp cheddar cheese
- 1/2 cup shredded mozzarella cheese
- 2 tbsp dry ranch seasoning mix
- 1/2 tsp garlic powder
- 1/4 tsp smoked paprika (adds a light smoky flavor)
- 1/4 tsp onion powder
- 1/4 tsp black pepper
- 1 tbsp fresh lime juice (brightens the filling)
- 1 tbsp chopped fresh cilantro (optional, but adds freshness)
- 6 slices bacon, cooked and crumbled (recommended)
- 2 tbsp sliced green onions
- 1 tbsp pickled jalapeños, finely chopped (optional, adds punch without changing texture)
- 1/2 cup panko breadcrumbs (optional topping)
- 1 tbsp melted butter (only if using panko)
- 2 tbsp grated parmesan (optional topping, helps browning)
Tip: If your cream cheese is too cold, the filling turns lumpy and doesn’t spread cleanly. Let it sit at room temp 30 minutes, or microwave it for 10 seconds just to soften (not melt).
Step-by-Step Instructions
1) Preheat and Set Up the Pan
Preheat the oven to 400°F. Position the rack in the center of the oven so heat distributes evenly across the tops. Line a large sheet pan with parchment paper or foil. If using foil, lightly spray it with cooking spray to prevent melted cheese from sticking.
Make sure the pan is large enough so the jalapeños sit without touching too tightly. Space allows even airflow and better browning.
2) Prep the Jalapeños for Controlled Heat
Slice each jalapeño lengthwise from stem to tip. Use a spoon to remove seeds and the white membrane. Scrape thoroughly for milder heat. If you prefer more spice, leave a small amount of membrane intact.
Keep the pepper halves intact and avoid tearing the sides. Place them cut-side up on the sheet pan so they sit flat and stable. If one wobbles, trim a thin slice off the bottom to level it.
3) Mix the Cream Cheese Base Until Smooth
In a mixing bowl, combine softened cream cheese, ranch seasoning, garlic powder, onion powder, smoked paprika, black pepper, and lime juice. Stir slowly at first, then mix more firmly until completely smooth.
The texture should be thick and spreadable, similar to a dense dip. If you see lumps, continue mixing before moving to the next step. Smooth filling ensures even baking and better structure.
4) Add Shredded Cheese for Melt and Structure
Fold in shredded cheddar and mozzarella. Stir until evenly distributed. The mixture should now appear thicker and slightly chunky from the shredded cheese.
Test the texture with a spoon. It should hold its shape and not slide off. If it feels too soft, refrigerate the mixture for 10 minutes to firm it before stuffing.
5) Add Bacon and Flavor Boosters
Fold in cooked crumbled bacon, green onions, and chopped cilantro if using. Keep bacon pieces small so the filling stays compact and easy to press into the peppers.
If adding chopped pickled jalapeños, use only a small amount. Too much added moisture can loosen the filling. The final mixture should mound easily without spreading.
6) Stuff the Jalapeños Neatly and Evenly
Spoon the filling into each jalapeño half. Press gently with the back of the spoon to remove air pockets and push the mixture into the corners.
Slightly mound the top, but keep the filling inside the edges of the pepper. Overfilling can cause spreading during baking. Even, compact filling ensures uniform cooking.
7) Add Optional Crunch Topping
If using panko, mix it with melted butter until lightly coated. Sprinkle a thin, even layer over each stuffed pepper.
For deeper browning, add a small pinch of grated parmesan on top. Keep the topping light so it crisps instead of clumping.
8) Bake Until Hot and Lightly Golden
Bake for 14–18 minutes, depending on pepper size. Watch for bubbling around the edges and small golden spots forming on top.
The jalapeños should soften but remain structured. The filling should look set and slightly puffed, not wet or loose.
9) Rest Before Serving
Remove the pan from the oven and let the poppers rest for 5 minutes. During this time, the cheese firms slightly, which prevents the filling from sliding when lifted.
For cleaner serving, place the poppers briefly on a paper towel-lined plate to absorb excess surface oil, then transfer to a serving tray.
| Nutrition Information (Per 2 Poppers) | |
|---|---|
| Calories | 210 |
| Protein | 9 g |
| Carbohydrates | 6 g |
| Fat | 17 g |
| Fiber | 1 g |
| Sodium | 520 mg |
Nutrition Disclaimer: Nutrition information is provided as an estimate only and can vary based on ingredient brands, portion size, substitutions, and preparation methods.
Why You Will Love This Recipe
This recipe works because the filling is thick and stable. Cream cheese provides the base structure, while shredded cheese adds melt and browning. Because the mixture is packed firmly, it stays inside the pepper during baking.
Moisture control comes from proper jalapeño prep. Removing seeds and membranes reduces water pockets. Baking at 400°F sets the top quickly, so the filling firms before the peppers over-soften.
Fat balance matters. Full-fat dairy keeps the filling smooth without separating. If using bacon, drain it well to prevent grease from thinning the mixture. For a lighter protein-focused alternative, high protein salad adds balance to a richer snack spread.
| Recipe At a Glance | |
|---|---|
| Recipe Name | Cheesy Jalapeno Ranch Poppers |
| Keyphrase | jalapeno ranch poppers |
| Cook Method | Baked |
| Skill Level | Beginner |
| Prep Style | Sheet Pan |
| Servings | 6 servings |
| Best For | Game day, gatherings, snack trays |
Servings and Pairings
Serve warm for best texture. Plan about 4 poppers per person when serving with other appetizers. If serving as the main snack item, increase to 6 per person.
They pair well with mild dips such as sour cream or plain ranch. A vegetable tray or grilled chicken platter balances the richness.
Helpful Tips and Variations
- Choose jalapeños similar in size for even baking.
- Chill filling 10 minutes if it feels too soft.
- Add 1/2 cup finely chopped cooked chicken for more protein.
- Use pepper jack for stronger heat.
- Bake on the center rack for even browning.
If you want another handheld option with similar flavor structure, buffalo chicken bombs keep the same spicy-cheesy balance in a baked format.
Storage and Make-Ahead Notes
Refrigerate leftovers in an airtight container for up to 3 days. Reheat at 350°F for 8–10 minutes until hot through.
You can stuff peppers up to 24 hours ahead. Keep covered in the refrigerator. Bake directly from cold and add 2–3 minutes.
Freezing is possible before baking. Freeze on a tray, then transfer to a freezer bag. Bake from frozen and increase time slightly.
Final Thoughts
Jalapeno ranch poppers stay reliable because the filling structure is stable, the bake time is short, and the seasoning is balanced. When you control moisture and pack the filling firmly, the result is creamy, structured, and easy to serve. If you enjoy baked cheese-forward recipes, cheesy bacon loaded fries offer another crowd-friendly option for gatherings.
Frequently Asked Questions
Remove all seeds and scrape out the white membranes completely before stuffing. The membranes hold most of the heat. You can also choose larger jalapeños, which are often milder than small thin ones.
The filling may be too soft or overfilled. Make sure the cream cheese is softened but not melted. Mix until thick, then press the filling firmly into the pepper halves without piling it too high.
Yes. Stuff the jalapeños, cover the tray tightly, and refrigerate up to 24 hours. Bake directly from cold and add 2–3 extra minutes so the centers heat through completely.
Yes. Air fry at 375°F for 7–9 minutes. Cook in batches so air circulates properly. Watch closely during the last 2 minutes because cheese browns faster in an air fryer.
For best texture, freeze them unbaked. Place stuffed poppers on a tray until solid, then transfer to a freezer bag. Bake from frozen and add several extra minutes. The peppers may soften slightly after freezing.
General Disclaimer: The content published on bitesrecipes.com is provided for general informational purposes only. While recipes are tested and written with care, results may vary based on ingredients, equipment, and individual cooking conditions.
bitesrecipes.com does not guarantee specific outcomes and encourages readers to follow proper food handling, cooking, and storage practices.